Problem
I can no longer log in to my Microsoft Windows server. I receive the following error message:
“There are currently no logon servers available to service the logon request.”
Cause
Your server is joined to a domain and uses domain accounts i.e. Active Directory to process logon requests.
When the server(s) running Active Directory are not available you can no longer log in.
As Active Directory is a distributed database the idea is to have more than 1 node in your WAN/LAN running Active Directory.
Small businesses however often only have a single server running Active Directory.
When you promote a server to a domain controller, the local administrator account is disabled for security purposes so that only domain accounts can be used.
If you haven’t manually created a non-domain local administrator account you will not be able to login.
Solution
At this stage you will effectively need to bypass server security. User domain login authentication was designed to keep malicious users out.
Contact us. We can help. It is easy to make matters worse at this stage. This is not something you want to get wrong.
These hacks all require access to the file system. There are various ways to gain access to the file system. If accessing the local file system using Windows, you will need to gain access to the built-in System account (“NT authority\system”). The System account cannot be used to login at a login prompt, but it can be used to create new local accounts or reset passwords for existing local accounts. A local administrator account will give you full access. However, you will not be able to take a member server out of a domain and join a workgroup unless the domain is active (Active Directory domain controller is online) and domain administrator credentials are entered when prompted to do so as you attempt to join a workgroup.
Full access using a local administrator account is often sufficient for workstations and member servers. For domain controllers you may want to diagnose Active Directory next.
Gaining access to a file system can be done using various techniques:
File system access #1 – Active Directory Services Restore Mode
Directory Services Restore Mode (DSRM) is a special boot mode for repairing or recovering Active Directory. It is used to log on to a domain controller server when Active Directory has failed or needs to be restored.
Note: Do not confuse DSRM with Safe Mode. For domain controllers, Active Directory will still attempt to start in Safe Mode(!) and if it fails you will not be able to log on. Instead, use DSRM. DSRM is basically ‘safe mode without Active Directory’. Member servers not running Active Directory will not have this option and can just use ‘Safe mode’.
You can log on to DSRM by using a special DSRM local username and password that you set when you promoted the domain controller. By default use the local logon account name .\administrator
Note that user accounts are not case sensitive.
DSRM is rarely needed on Windows Server 2008-2016. AD can be stopped and re-started without a reboot, making DSRM unnecessary. DSRM is only needed when you are using remote desktop software, or when doing a domain-wide restore or a forest-wide restore, or when AD is so damaged that it will not boot.
Booting into DSRM mode
To manually boot in Directory Services Restore Mode, press the F8 key repeatedly. Do this immediately after BIOS POST screen, before the Windows logo appears. (Timing can be tricky; if the Windows logo appears you waited too long.) A text menu menu will appear. Use the up/down arrow keys to select Directory Services Restore Mode or DS Restore Mode. Then press the Enter key.
Windows 8 / Windows Server 2012 or later: The F8 menu is disabled. You can enable the F8 menu but it requires administrative privileges…
If your server is a VM, try running it in Full Screen mode for the F8 key to work. You can also enable a boot menu option or run the VM in paused mode to allow for a delay before the system boots in POST. This should allow the F8 boot menu to work.
How to Log on to DSRM
After booting into DSRM mode you will be presented with a normal CTRL-ALT-DEL Windows logon prompt. The initial logon prompt will show the account name MyDomain\Administrator, where MyDomain is the name of the domain. This will not work. You must click on Switch User and manually type the name .\administrator.
If you are able to access the server using DSRM mode you can use the command prompt Accessibility hack to regain access to the server.
If you forgot the DSRM password you are out of luck using this method to gain command prompt access.
This is how you would do it if you had full system access:
- Click, Start, click Run, type ntdsutil, and then click OK.
- At the Ntdsutil command prompt, type set dsrm password.
- At the DSRM command prompt, type reset password on server null. The null variable assumes that the DSRM password is being reset on the local computer. Type the new password when you are prompted. Note that no characters appear while you type the password.
- At the DSRM command prompt, type q.
- At the Ntdsutil command prompt, type q to exit.
File System Access #2 – Using Bootable Media
Okay, so the DSRM and safe mode options did not work. We may now have to start looking at WinPE or Linux bootable ISOs and stuff. So first you need to know a bit about how to boot from a memory stick:
EFI (Legacy) boot mode
Use Rufus to create an EFI bootable FAT32 (or NTFS) formatted USB memory stick.
Alternatively download and use bootsect.exe /NT60 X: where X: is the drive letter of the USB memory stick.
EFI bootable media use the Master Boot Record (MBR) boot partition structure.
The Master Boot Record is created when you create the first partition on a hard disk or bootable media. It is contained in the first sector on every disk. The location is always track (cylinder) 0, side (head) 0, and sector 1.
EFI (Legacy) boot may not support USB memory sticks with fancy USB3 controllers that show up as “Local Disk” instead of “Removable Media”. (Also, if you are using UEFI boot in combination with Windows unattended.xml installations and wonder why the unattend file is not working, this is why). Try a different USB stick
EFI (Legacy) boot may not support USB memory sticks that are large in size (USB2 8GB memory sticks seems to always work on systems with an older BIOS).
UEFI
Simply format a USB memory stick as FAT32.
UEFI only works in combination with UEFI aware operating systems.
UEFI boot media often contain a directory BOOT or SOURCE and an *.EFI file and BCD file.
Microsoft introduced UEFI for x86-64 Windows operating systems with Windows Server 2008.
You can simply extract any ISO to a FAT32 formatted USB memory stick and set your BIOS to UEFI boot mode.
There is no need to make the USB memory stick ‘bootable’.
Most Linux distributions and bootable utilities discs will require EFI boot mode.
UEFI offers a Secure Boot feature which may be enforced by your hardware vendor and in rare occasions.
File System Access #3 – Windows Server bootable ISO DVD
Boot using a Windows Server install DVD. When the Preinstallation Environment (WinPE) launches select the Repair Your Computer option followed by Troubleshooting and Command Prompt.
File System Access #4 – WinPE
Without going into detail, use DISM/ImageX to mount and edit a WinPE BOOT.WIM image and look for the script or program that launches when the WinPE is finished initializing. Use DISM (GUI) to inject RAID drivers into a WinPE BOOT.WIM file in offline mode. Use a WinPE BOOT.WIM on a FAT32 USB memory stick and boot the server using (EFI or) UEFI boot mode. Gain command prompt access inside the WinPE by pressing SHIFT-F10 (only works on older WinPE environments) or by hijacking any command prompt script by pressing CTRL-C.
Hack #1 – Offline NT password editor
Use Offline NT password editor. This utility is included in a Hirens Boot CD.
http://pogostick.net/~pnh/ntpasswd/
This will only work if the computer can be booted in EFI mode and does not have a hardware RAID controller.
This utility is great for workstations but not so much for servers. It cannot be used to reset Active Directory passwords obviously, only local (administrator) account passwords.
In order to access hard disks on a RAID5 volume on a hardware raid controller you will need to add the RAID controller drivers to the bootable media. This is not a trivial thing to do.
Hack #2 – Windows Server ‘Accessibility’ hack
Step 1:
You can use a WinPE for this in UEFI boot mode, a Linux live CD in EFI mode or any other bootable solution that will give you a command prompt and access to the local hard disk. If data is stored on a RAID5 volume using a hardware RAID controller, your bootable media will need to contain RAID controller drivers.
Assuming that you now have access to the filesystem, we can continue to the next step.
Step 2:
Navigate to the %systemdrive%\WINDOWS\System32 folder and rename one of the accessibility tools. I typically rename magnify.exe to something like magnify.exe.bak.
Next, make a copy of cmd.exe and name it magnifiy.exe. The command sequence would be something like this if you’re using a Windows command prompt:
c:
cd
cd windows
cd system32
move magnify.exe magnify.exe.bak
copy cmd.exe magnify.exe
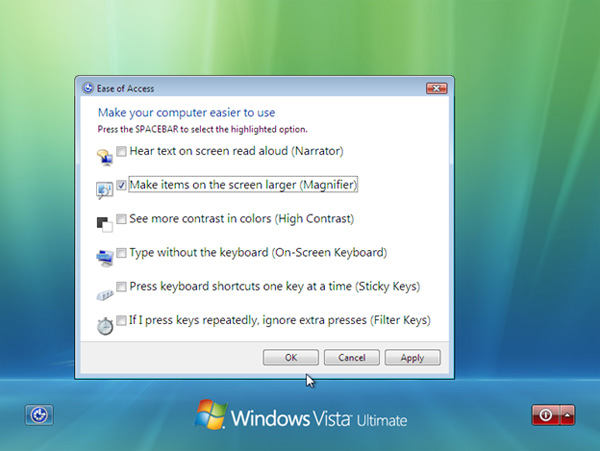
You can also rename UtilMan.exe (which kicks in when you click on the Accessibility button).
You can also rename osk.exe (On Screen Keyboard)
You can also rename sethc.exe (Sticky Keys)
You can also rename narrator.exe (Narrator)
The High Contrast option uses desk.cpl and changes the active theme; there is no single executable to substitute.
Filter Keys is activated by pressing the SHIFT key 5 times rapidly; there is no single executable to substitute.
Step 3:
Boot the system and wait for the login screen to appear.
Step 4:
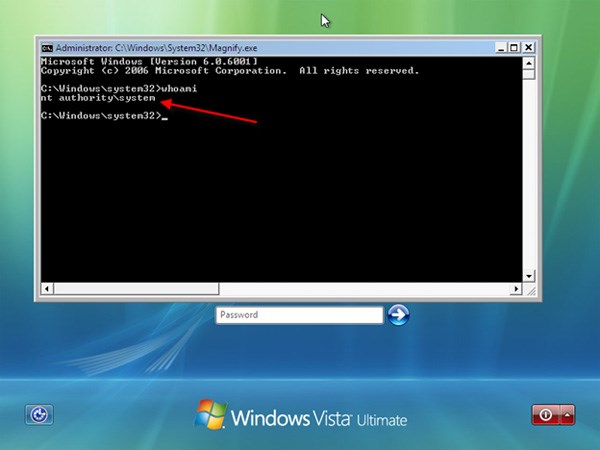
At the login screen, click the accessibility icon and choose the accessibility tool that you renamed and replaced with cmd.exe. In my case, it’s the magnifier.
A command prompt will pop up running as the SYSTEM user.
Step 5:
Now you can change the password for any local account using NET USER [username] *
Net user
The “net user” command can be used to reset passwords for local and domain accounts.
You can use “net user /domain” to reset an Active Directory user account password.
This obviously does not work if Active Directory is not available.
You may be able to enable the local administrator account and set a password:
net user administrator /active:yes
net user administrator *
Alternatively you can create a new local user and grant the new user administrative privileges:
net user bob /add     -or-
net user bob * /add
(You will be prompted to set a password).
net localgroup administrators bob /add
You need to be running a command prompt using administrative privileges in order to do so.
Step 6:
Log in with the new user account and password.
Don’t forget to revert the renamed files to their original names (!)
Considerations
Note that if ever anyone gains physical access to the server and uses this exact same loophole they too will be able to login to the server with a local administrator account. Keep your server in a secure location.


