Author Archives: tabcom

Microsoft Windows Server 2016

Next Training Session

Date: Wednesday 17 May 2017
Time: 08:00pm – 10:00pm
Location: (Rangeview) Tolga, QLD
Cost: $90
Subject Microsoft Windows Server 2016

Description

In this hands-on guided training session, we will have a look at Microsoft Windows Server 2016.   We will spin up a virtual machine and explore the various components which make it different from a non-server version of Windows.

This 2 hour training session will teach you the basics of using Windows Server 2016 and should give you the confidence to work with Active Directory and setup user accounts and services like DHCP and DNS.

Expressions of interest

Use the ‘Contact Us’ page to inquire about availability and to register for this course.  It is recommended to bring a computer, but if none available one will be provided.  Thank you for your interest.

Microsoft Windows Server 2016 was last modified: April 29th, 2017 by tabcom

Restore data using Sage DataSecure online cloud backup

Problem

Our server is experiencing hardware problems.  We need access to our backups to restore files and folders.

Solution

Sage DataSecure online cloud backup can be used to restore individual files and folders.  It cannot be used to restore a complete system as this would requires snapshot / software imaging technology that is difficult to execute whilst the server is up and running and connected to the internet.

To access your online cloud backup data sets perform the following steps:

  1. Login to a computer running Microsoft Windows.
    1a. Visit http://www.sagedatasecure.com.au and register for a 14 day Trial.
    1b. You will be sent an email with a download link to the software installation package.
  2. Alternatively simply download the software from here directly: http://www.sagedatasecure.com.au/downloads.jsp?referrerid=SAGEDATAS
  3. Download “Windows 64 Bit Sage DataSecure install” (or 32 bit, if using an older version of Windows)
  4. Install the software.
  5. Run the software.

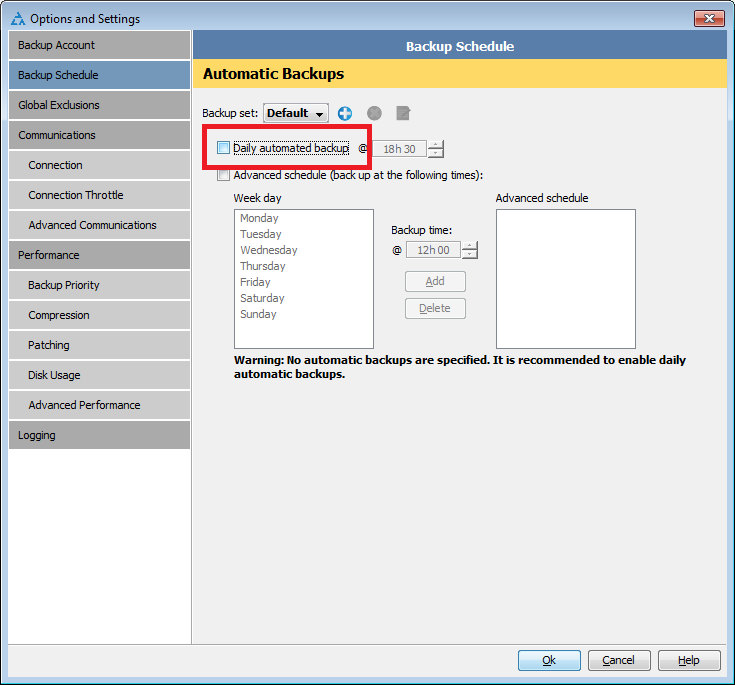
By default the software will not take a backup.  As long as you do not set a backup schedule, backups will not be created and there is no chance of data being overwritten.

Make sure to leave the option for daily automated backups unticked at this stage.
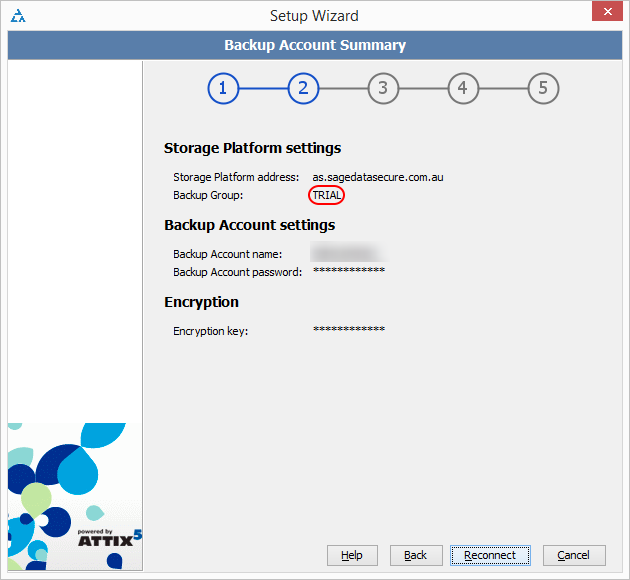
If you enter your existing credentials the software will fail to connect.  This is because it attempts to connect to the TRIAL backup group.
To change to the LIVE backup group you will need to edit a text file named “default.properties” located in “C:\Program Files\Sage….” and change a value from TRIAL to LIVE.
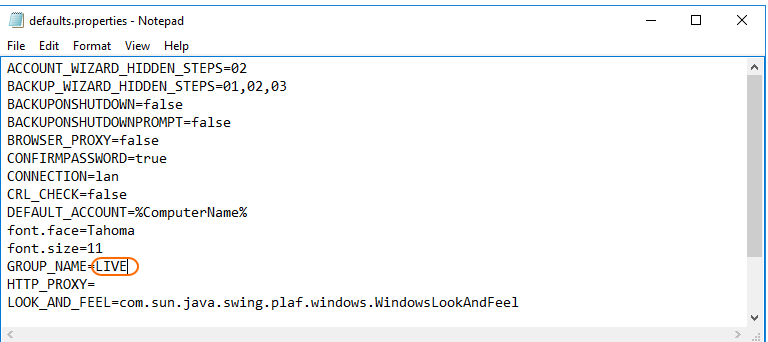
You may have to edit permissions to give users ‘modify’ permission on this file in order to save the changes, or run ‘explorer’ as an administrator.

This should enable you to connect to your backup data sets and browse / restore individual files and folders.


Restore data using Sage DataSecure online cloud backup was last modified: May 3rd, 2017 by tabcom

How to enable the Windows Server F8 menu and boot into Directory Services Restore Mode (DSRM)

#1 – Use bcdedit to enable the BCD boot  menu

To display the boot menu that would normally appear when you pressed F8 you need use an elevated command prompt.

Once you have a Command Prompt (as an administrator) enter the following commands which are self-explanatory:

  1. bcdedit /set {bootmgr} displaybootmenu yes
  2. bcdedit /set {bootmgr} timeout 10

#2 – Use bcdedit to launch DSRM

On Windows Server 2008 or later you can run bcdedit inside of an administrative console:

  1. To boot DSRM, type the command bcdedit /set safeboot dsrepair, then reboot: shutdown /r /f /t 5.
  2. When you are ready to boot normally, type bcdedit /deletevalue safeboot, then reboot: shutdown /r /f /t 5.

You can use this procedure when a graphical user interface (GUI) is not available (e.g., on Server Core).

#3 – Use msconfig.exe to launch DSRM

You can configure Windows to boot DSRM using msconfig.exe:

  1. Click on Start (or press WIN+X) -> Run.
  2. In the Open box type msconfig and click OK. This will show the System Configuration dialog box.
  3. Click on the tab Boot (top).
  4. Under “Boot options” check the box Safe boot.
  5. Select Active Directory repair and click OK.
  6. Reboot the computer: Click on Start (or press WIN+X -> Shut down or sign out -> Restart.

This will boot the computer into DSRM.

To boot normally, reverse the procedure:

  1. Click on Start (or press WIN+X) -> Run.
  2. In the Open box type msconfig and click OK. This will show the System Configuration dialog box.
  3. Click on the tab Boot (top).
  4. Under “Boot options” uncheck the box Safe boot and click OK.
  5. Reboot the computer: Click on Start (or press WIN+X -> Shut down or sign out -> Restart.

This will boot the computer back into normal mode.

If you want to boot into Safe Mode, run msconfig and select Minimal. Then reboot.


How to enable the Windows Server F8 menu and boot into Directory Services Restore Mode (DSRM) was last modified: April 26th, 2017 by tabcom